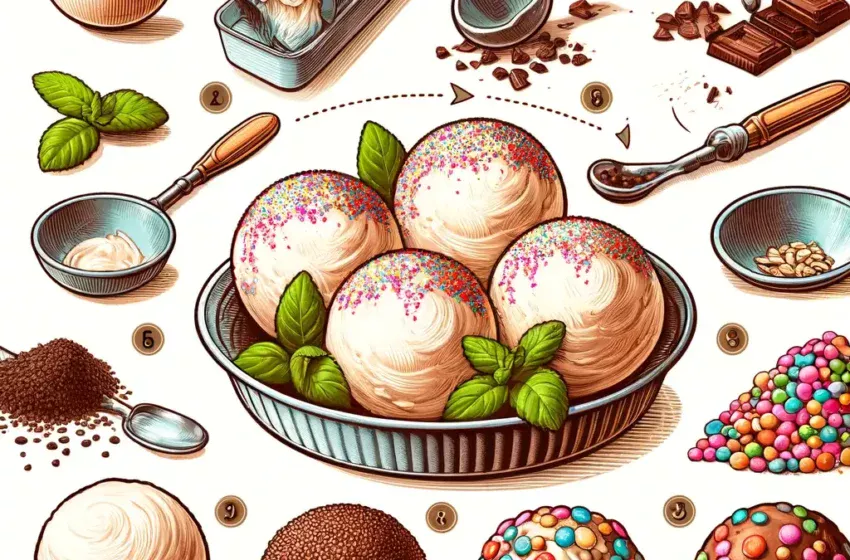
Ultimate Guide to Making Delicious Ice Cream Balls: A Step-by-Step Recipe
As a food reviewer, I’ve had my fair share of delightful desserts, but few things compare to the joy of a well-made ice cream ball. This delectable treat combines the creamy goodness of ice cream with the fun and convenience of bite-sized servings, making it a perfect dessert for any occasion. In this guide, I will take you through the ins and outs of making your very own ice cream balls at home, complete with pro tips and all the reasons why you’ll fall in love with this recipe. Let’s dive in!
What is an Ice Cream Ball?
An ice cream ball is essentially scoops of ice cream, formed into perfect spheres and often coated with various toppings such as melted chocolate, nuts, or sprinkles. The beauty of ice cream balls lies in their versatility; you can choose any flavor of ice cream and pair it with your favorite coatings to create a personalized treat that’s as fun to make as it is to eat.
How To Make Ice Cream Balls Recipe
- Preparation Time
15 minutes (plus freezing time) - Cooking Time
Not applicable - Serves
Varies depending on the amount of ice cream used - Difficulty
Easy
Ingredients
- Your choice of ice cream
- Melted chocolate (dark, milk, or white)
- Toppings (nuts, sprinkles, crushed cookies, or any of your favorite toppings)
Tools:
- Ice cream scoop
- Baking sheet
- Parchment paper
- Small bowls for toppings
Instructions
Step 1: Prep Your Station
Line a baking sheet with parchment paper. This will be where you place your ice cream balls once they are formed. Set out your bowls of melted chocolate and toppings for easy access.
Step 2: Scoop and Shape
Using an ice cream scoop, scoop out balls of your chosen ice cream. Work quickly to shape them into smooth spheres. If the ice cream starts to melt, place it back in the freezer for a few minutes to firm up.
Step 3: Freeze the Balls
Place the ice cream balls on the prepared baking sheet and freeze for at least 1 hour, or until they are completely firm.
Step 4: Coat the Balls
Once the ice cream balls are firm, roll them quickly in melted chocolate, and then immediately in your chosen toppings. The chocolate will harden quickly upon contact with the cold ice cream.
Step 5: Final Freeze
Place the coated ice cream balls back on the baking sheet and freeze again until the chocolate is set, about 15 to 30 minutes.
Pro Tips For Ice Cream Balls Recipe
- For a smoother chocolate coating, use a fork to dip and roll the ice cream balls in chocolate, allowing the excess to drip off.
- Experiment with flavors by combining different ice creams and coatings. The possibilities are endless!
Why You Will Love This Ice Cream Balls Recipe
- Customizable: With endless combinations of ice cream and toppings, you can create a dessert that’s uniquely yours.
- Fun to Make: Making ice cream balls is a fun activity for all ages, perfect for family bonding or entertaining guests.
- Perfect for Any Occasion: Whether it’s a hot summer day or a festive celebration, ice cream balls are a hit in any setting.
How to Eat Ice Cream Balls
Enjoy your ice cream balls as soon as they are set. You can eat them as they are or serve them with a drizzle of sauce, whipped cream, or alongside a slice of cake for a more decadent dessert.
Conclusion
Ice cream balls are a delightful treat that’s both fun to make and delicious to eat. With this easy-to-follow recipe, you can create your own frozen delights that are sure to impress everyone. If you loved this recipe, don’t forget to share it with your friends and family!
You Can Also Read:- Nostalgia Ice Cream Maker Recipes
FAQ: Making Delicious Ice Cream Balls
1. What are ice cream balls?
A: Ice cream balls are scoops of ice cream formed into spheres, often coated in chocolate and various toppings for extra flavor and texture.
2. Can I use any type of ice cream?
A: Yes, you can use any flavor or type of ice cream you prefer. The firmer the ice cream, the easier it will be to shape.
3. How do I prevent the ice cream from melting while forming balls?
A: Work quickly and consider chilling your tools beforehand. If the ice cream starts to melt, place it back in the freezer to firm up.
4. What can I use for coatings?
A: Melted chocolate, crushed nuts, sprinkles, crushed cookies, or any topping you enjoy with ice cream.
5. How long does it take to freeze the ice cream balls?
A: It typically takes at least 1 hour to freeze the balls until they are firm. After coating them, freeze again for 15 to 30 minutes.
6. Do I need any special tools?
A: An ice cream scoop is helpful for forming balls, but you’ll also need a baking sheet, parchment paper, and small bowls for your coatings.
7. Can ice cream balls be made in advance?
A: Yes, they can be made several days in advance. Keep them stored in an airtight container in the freezer.
8. How do I get a smooth chocolate coating?
A: Use a fork to dip the ice cream balls in melted chocolate, allowing excess chocolate to drip off for a smooth coat.
9. Can I use homemade ice cream?
A: Absolutely! Homemade ice cream can be used and might even make the dessert more special.
10. How do I serve ice cream balls?
A: Serve them as they are or with additional toppings, sauces, or alongside cake or cookies.
11. Are ice cream balls suitable for parties?
A: Yes, they are perfect for parties since they can be made in advance and customized to suit any theme or preference.
12. Can I make vegan ice cream balls?
A: Yes, use vegan ice cream and ensure your chocolate and toppings are also vegan.
13. How can I prevent the chocolate from cracking?
A: Let the ice cream balls sit for a minute or two after the final freeze before serving, to slightly soften.
14. Can I refreeze ice cream balls if they start to melt?
A: Yes, if they begin to melt during the coating process, refreeze them until they are firm again.
15. What’s the best way to store ice cream balls?
A: Store them in an airtight container, separated by parchment paper layers, in the freezer.
16. How long can I store ice cream balls?
A: They can be stored for up to 2 weeks in the freezer without losing quality.
17. Can I use yogurt instead of ice cream?
A: Yes, frozen yogurt can be a lighter alternative, though it might be softer and more challenging to work with.
18. Is it necessary to use parchment paper?
A: Parchment paper prevents the ice cream balls from sticking to the tray and helps with cleanup.
19. Can I make ice cream balls without chocolate?
A: Yes, you can roll them in dry toppings like nuts or sprinkles without coating them in chocolate first.
20. How do I choose toppings?
A: Consider textures and flavors that complement your ice cream choice. The contrast is often delightful.
21. Can children help make ice cream balls?
A: Yes, making ice cream balls is a fun and easy activity for children under supervision.
22. Can I use fruit as a topping?
A: Yes, dried fruit can be a great topping, but use it sparingly as it can be hard to adhere.
23. How do I make a nut-free version?
A: Use nut-free toppings like crushed cookies, seeds, or safe chocolate chips.
24. Can I use different chocolates for coating?
A: Yes, mixing different types of chocolate can add depth to the flavor.
25. What if the ice cream balls are too hard to eat right away?
A: Let them sit at room temperature for a few minutes before serving to slightly soften.
26. Can I make mini ice cream balls?
A: Absolutely! Use a smaller scoop for bite-sized treats.
27. How do I ensure even coating of toppings?
A: Roll the chocolate-coated balls thoroughly in the toppings, pressing gently if necessary.
28. Can I add a filling to ice cream balls?
A: Yes, you can insert a small piece of fruit, chocolate, or caramel inside the ice cream before freezing.
29. Can ice cream balls be served at outdoor events?
A: Yes, but keep them in a cold storage container until ready to serve to prevent melting.
30. Can I use liqueur in my ice cream balls?
A: Yes, a small amount of liqueur can be mixed into the ice cream or chocolate for an adult twist.