Butterfinger Balls Recipe: A Delectable Treat
As a food reviewer who has had the pleasure of tasting countless confections, I can confidently say that Butterfinger Balls stand out as a uniquely delightful treat. These bite-sized morsels encapsulate the perfect blend of crunchy, sweet, and chocolatey flavors that are bound to satisfy any sweet tooth. Below, I’ll guide you through the step-by-step process of making these irresistible treats, along with pro tips, health benefits, and a conclusion on why they should be your next homemade snack.
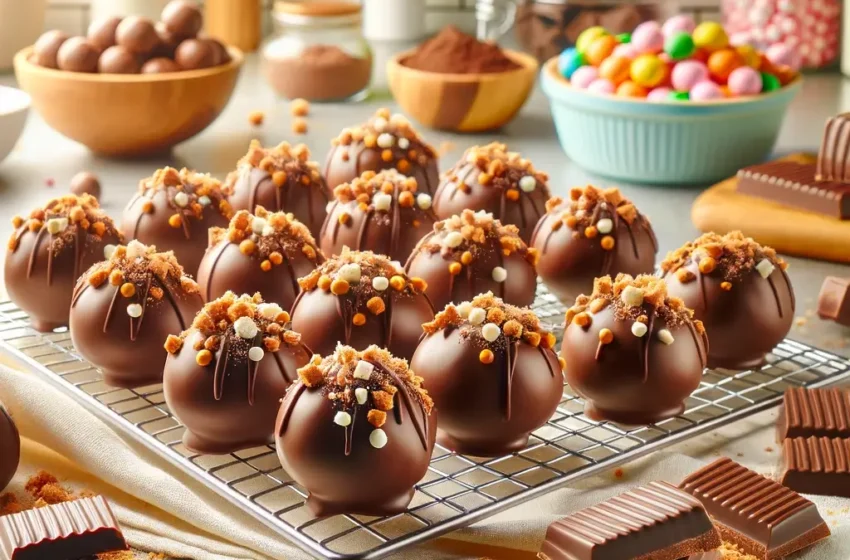
Overview Of How To Make Butterfinger Balls.
- Preparation Time
30 minutes - Cooking Time
1 hour - Serves
24 balls - Difficulty
Easy
Ingredients
- 1 cup creamy peanut butter
- 2 cups crushed Butterfinger candy bars (about 3-4 bars)
- 1 cup graham cracker crumbs
- 1/4 cup unsalted butter, melted
- 1 1/2 cups powdered sugar
- 1 teaspoon vanilla extract
- 2 cups semi-sweet chocolate chips
- 2 tablespoons coconut oil or shortening (optional, for smoother chocolate)
Instructions
- Step 1: Crush the Butterfingers
Begin by crushing the Butterfinger bars into small pieces. You can do this by placing the bars in a sealed bag and using a rolling pin or heavy object to break them down. Aim for a mix of finer pieces and some slightly chunkier bits for texture. - Step 2: Mix the Ingredients
In a large bowl, combine the crushed Butterfingers, peanut butter, graham cracker crumbs, melted butter, powdered sugar, and vanilla extract. Mix thoroughly until the ingredients are well combined and you have a consistent mixture. - Step 3: Form the Balls
Using a tablespoon or a small ice cream scoop, form the mixture into balls approximately 1 inch in diameter. Place them on a baking sheet lined with parchment paper. If the mixture is too sticky, refrigerate it for about 20 minutes before forming the balls. - Step 4: Chill
Once all the balls are formed, chill them in the refrigerator for at least 30 minutes to firm up. This step is crucial for ensuring they hold their shape when dipped in chocolate. - Step 5: Melt the Chocolate
Melt the chocolate chips in a microwave-safe bowl in 30-second intervals, stirring in between, until smooth. If using, mix in the coconut oil or shortening to achieve a smoother, more dip-friendly consistency. - Step 6: Dip the Balls
Dip each chilled ball into the melted chocolate using a fork or a dipping tool, ensuring it’s fully coated. Let the excess chocolate drip off before placing the ball back on the parchment paper. - Step 7: Chill Again
Refrigerate the coated balls for another 30 minutes, or until the chocolate has completely set.
Pro Tips
- For an even coat of chocolate, tap the fork on the edge of the bowl to remove excess chocolate before placing the balls on the parchment paper.
- Add a pinch of sea salt to the melted chocolate to enhance the flavors.
- Store in an airtight container in the refrigerator to maintain freshness.
Health Benefits
While Butterfinger Balls are undoubtedly a treat, incorporating peanut butter provides a source of protein and healthy fats. Opting for dark chocolate can also offer antioxidants. However, enjoy these in moderation as part of a balanced diet.
Conclusion
Butterfinger Balls are a fantastic treat that combines the beloved flavors of Butterfinger candy bars with the richness of chocolate and peanut butter. Whether for a party, holiday, or a cozy night in, these treats are sure to impress. The process of making them is straightforward and offers room for creativity, especially in choosing the type of chocolate for coating.
You Can Also Read:- Fruity Pebbles Treats Recipe
FAQs on Butterfinger Balls Recipe
1. What are Butterfinger Balls?
A: Butterfinger Balls are bite-sized treats made from crushed Butterfinger candy bars, peanut butter, and chocolate, formed into balls and coated in melted chocolate.
2. Can I use crunchy peanut butter instead of creamy?
A: Yes, crunchy peanut butter can be used for added texture, but it might make the mixture slightly harder to shape.
3. How do I store Butterfinger Balls?
A: Store them in an airtight container in the refrigerator for up to 2 weeks.
4. Can Butterfinger Balls be frozen?
A: Yes, they can be frozen for up to 3 months. Thaw in the refrigerator before serving.
5. Are Butterfinger Balls gluten-free?
A: Not typically, due to the presence of graham cracker crumbs and certain brands of Butterfinger bars. However, gluten-free alternatives can be used.
6. Can I make these vegan?
A: Yes, by using vegan chocolate, plant-based butter, and a vegan-friendly peanut butter.
7. What can I use instead of Butterfinger bars?
A: Any similar crunchy peanut butter candy bar can be used, or a mix of peanut butter and crushed peanuts for a homemade twist.
8. Can I add other ingredients to the mix?
A: Yes, ingredients like crushed nuts, mini chocolate chips, or a sprinkle of sea salt can add extra flavor and texture.
9. How do I ensure the chocolate coating is smooth?
A: Adding coconut oil or shortening to the melted chocolate can help achieve a smoother consistency.
10. What if I don’t have a microwave to melt the chocolate?
A: You can melt the chocolate using a double boiler on the stove, stirring constantly to prevent burning.
11. Can I decorate Butterfinger Balls?
A: Yes, before the chocolate sets, sprinkle with crushed Butterfinger pieces, sea salt, or drizzle with a different type of chocolate for decoration.
12. Why did my chocolate seize while melting?
A: Chocolate can seize if it comes into contact with water. Ensure all utensils and the bowl are completely dry.
13. My balls aren’t perfectly round. What can I do?
A: After chilling for a few minutes, you can roll them between your hands again to smooth out any irregularities.
14. Can I make these with white chocolate?
A: Absolutely, white chocolate can be a delicious coating alternative.
15. How long do I need to chill the balls before dipping in chocolate?
A: Chill for at least 30 minutes, or until they are firm to touch.
16. The mixture is too sticky. What should I do?
A: Chill the mixture in the refrigerator for 20-30 minutes before attempting to form the balls again.
17. Can I use homemade peanut butter?
A: Yes, homemade peanut butter is a great option for this recipe.
18. What’s the best way to crush Butterfinger bars?
A: Place them in a ziplock bag and use a rolling pin or heavy object to crush them into small pieces.
19. How can I make these healthier?
A: Use dark chocolate for coating and reduce the powdered sugar in the mix to lower the sugar content.
20. Why is my chocolate not setting on the balls?
A: The chocolate may not set if the room temperature is too high. Try chilling them in the refrigerator to help the chocolate set.
21. Can I use a food processor to crush the Butterfingers?
A: Yes, but pulse carefully to avoid turning the candy into too fine of a powder.
22. How do I melt chocolate chips without burning them?
A: Melt them in short intervals in the microwave, stirring between each, or use a double boiler on low heat.
23. Can I make these without graham cracker crumbs?
A: Yes, you can substitute with crushed cookies or leave them out and adjust the peanut butter quantity for consistency.
24. My balls are falling apart when I try to dip them in chocolate. What am I doing wrong?
A: Ensure they are chilled and firm enough before dipping. If they are still falling apart, your mixture may need more peanut butter or less dry ingredients.
25. Can I substitute the powdered sugar with another sweetener?
A: Yes, but it might affect the texture. Liquid sweeteners are not recommended as they can make the mixture too wet.
26. How do I make the balls the same size?
A: Use a small ice cream scoop or a tablespoon measure to scoop out even amounts of the mixture.
27. Can these be made nut-free?
A: Since peanut butter and Butterfinger bars are key ingredients, finding a nut-free alternative that provides the same flavor and texture might be challenging.
28. How can I ensure the chocolate coating doesn’t crack?
A: Let the balls come to a slight room temperature after chilling before dipping in chocolate to prevent the coating from cracking due to temperature shock.
29. Can I use milk chocolate instead of semi-sweet?
A: Yes, milk chocolate can be used for a sweeter taste.
30. How do I know when the Butterfinger Balls are ready to eat?
A: Once the chocolate coating has fully set and the balls are chilled, they are ready to enjoy!