The Ultimate Guide to Making Fruity Pebbles Treats: A Colorful and Delicious Dessert
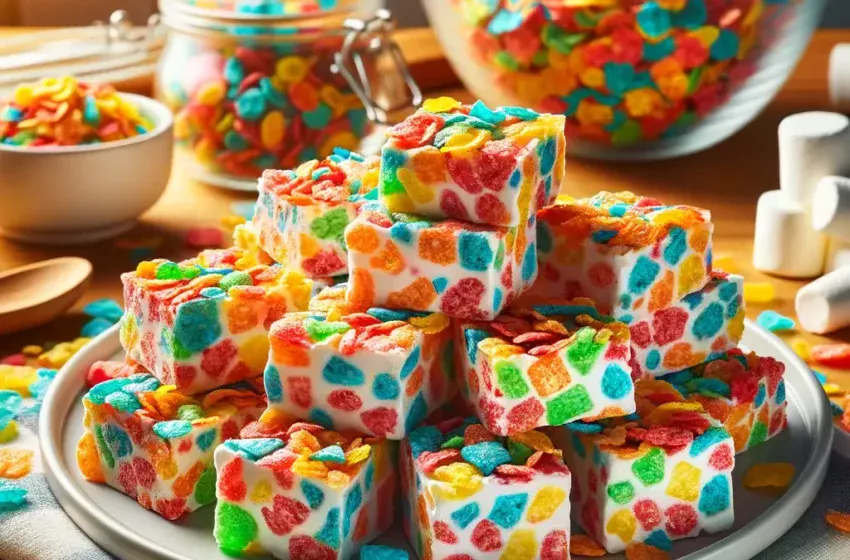
As a food reviewer who has had the pleasure of tasting countless sweet treats, it’s rare to come across a dessert that truly stands out in both flavor and presentation. However, the Fruity Pebbles Treats recipe is one such delight that not only captivates the eye with its vibrant colors but also enchants the taste buds with its unique combination of textures and flavors. This treat is essentially a twist on the classic rice crispy treats, substituting rice cereal with Fruity Pebbles to create a more colorful and fruity flavored dessert.
What Are Fruity Pebbles Treats?
Fruity Pebbles Treats are a no-bake dessert made by mixing Fruity Pebbles cereal with melted marshmallows and butter. The result is a chewy, crispy, and slightly gooey treat that’s bursting with fruity flavor and a kaleidoscope of colors. They’re perfect for parties, special occasions, or simply when you’re in the mood for something sweet and fun.
Overview Of How To Make Fruity Pebbles Treats Recipe.
- Preparation Time
10 minutes - Cooking Time
0 minutes (1 hour for cooling) - Serves
12-16 people - Difficulty
Easy
Ingredients You’ll Need
- 6 cups of Fruity Pebbles cereal
- 10 oz (about 40) marshmallows
- 3 tablespoons of unsalted butter
- A pinch of salt (optional)
Step by Step Instructions:
- Step 1: Prepare Your Pan
Grease a 9×13 inch baking pan with butter or line it with parchment paper. This ensures your treats won’t stick and are easy to remove. - Step 2: Melt the Marshmallows
In a large pot, melt the butter over low heat. Add the marshmallows to the pot and stir continuously until they’re completely melted. A pinch of salt can be added here to balance the sweetness. - Step 3: Add Fruity Pebbles
Remove the pot from the heat and immediately add the Fruity Pebbles cereal. Stir the mixture gently but quickly to ensure the cereal is evenly coated with the marshmallow mixture. - Step 4: Press Into the Pan
Transfer the mixture to your prepared pan. Using a spatula or your hands (lightly greased to prevent sticking), press the mixture down into an even layer. - Step 5: Cool and Serve
Allow the treats to cool at room temperature for about 1 hour before cutting into squares or bars.
Pro Tips For Fruity Pebbles Treats Recipe
- For extra gooey treats, add an additional cup of marshmallows.
- If you prefer your treats with a bit more crunch, reduce the marshmallows slightly.
- Adding a teaspoon of vanilla extract to the melted marshmallow mixture can enhance the flavor.
Why You Will Love This Recipe
- Vibrant and Fun: The colorful appearance makes it a hit among both kids and adults.
- Easy to Make: No baking required and only three main ingredients.
- Customizable: Experiment with adding ingredients like white chocolate chips or a drizzle of chocolate on top for variety.
How to Eat
Enjoy these treats at room temperature for the perfect balance of chewiness and crispiness. They’re best eaten within a day or two but can be stored in an airtight container for up to a week.
Conclusion
Fruity Pebbles Treats are a delightful twist on a classic dessert. They’re easy to make, require minimal ingredients, and offer a perfect bite of nostalgia with a fruity punch. Whether you’re looking for a fun party snack or a colorful dessert to brighten your day, these treats are sure to please. If you love this recipe, don’t forget to share it with your friends and family!
FAQs on Fruity Pebbles Treats
1. What are Fruity Pebbles Treats?
Fruity Pebbles Treats are a no-bake dessert made from Fruity Pebbles cereal, marshmallows, and butter, creating a colorful and fruity variation of traditional crispy rice treats.
2. Do I need to bake Fruity Pebbles Treats?
No, Fruity Pebbles Treats are a no-bake dessert. The only heat required is to melt the marshmallows and butter.
3. Can I use a different type of cereal?
Yes, while Fruity Pebbles are recommended for their fruity flavor and colorful appearance, you can use any cereal you like.
4. Are Fruity Pebbles Treats gluten-free?
Fruity Pebbles cereal is gluten-free, but you should always check the packaging of your ingredients to ensure they meet your dietary requirements.
5. Can I add chocolate to Fruity Pebbles Treats?
Yes, you can add chocolate chips to the mixture or drizzle melted chocolate over the top once the treats are set.
6. How do I prevent the treats from sticking to the pan?
Grease your pan with butter or line it with parchment paper for easy removal.
7. Can I make Fruity Pebbles Treats in the microwave?
Yes, you can melt the marshmallows and butter together in a microwave-safe bowl, but be sure to do it in short intervals, stirring in between.
8. How long do Fruity Pebbles Treats last?
They’re best eaten within 1-2 days but can be stored in an airtight container at room temperature for up to a week.
9. Can Fruity Pebbles Treats be frozen?
Yes, though freezing may alter the texture. Wrap them tightly and freeze for up to 3 months. Thaw at room temperature before serving.
10. Why are my treats too hard?
This can happen if the marshmallow mixture is cooked for too long or at too high a temperature. Melt the marshmallows slowly over low heat.
11. Can I use mini marshmallows instead of regular-sized marshmallows?
Yes, mini marshmallows can be used and may melt more quickly. Use the equivalent amount by weight.
12. How do I cut the treats without them sticking to the knife?
Grease your knife with butter or non-stick spray before cutting.
13. Can I make Fruity Pebbles Treats vegan?
Yes, use vegan marshmallows and butter substitutes. Ensure your Fruity Pebbles are vegan-friendly as well.
14. How can I make my treats extra gooey?
Increase the amount of marshmallows by about a cup for extra gooeyness.
15. Can I add nuts or dried fruit?
Absolutely! Add them to the cereal mixture before pressing into the pan for added texture and flavor.
16. Why did my treats come out too sticky?
Too sticky treats can result from not enough cereal in the marshmallow mixture. Ensure you use the correct ratio.
17. How do I store Fruity Pebbles Treats?
Store them in an airtight container at room temperature to maintain their texture.
18. Can I make these treats ahead of time?
Yes, they can be made a day or two in advance, making sure they’re stored properly.
19. Why are my treats falling apart?
This can occur if there’s not enough marshmallow mixture to bind the cereal. Make sure all the cereal is well coated.
20. Can I use a different type of marshmallows?
Yes, any marshmallows will work, but flavored marshmallows might alter the taste of your treats.
21. What’s the best way to press the mixture into the pan?
Using a spatula or wax paper to press the mixture helps spread it evenly without sticking to your hands.
22. Can I make these treats with less sugar?
Reducing marshmallows will decrease the sugar content, but it may also affect the texture.
23. Is there a way to make these treats healthier?
While they are a treat, you can add ingredients like nuts or use a cereal with lower sugar content for a slight nutritional boost.
24. Can I make Fruity Pebbles Treats with marshmallow fluff?
Yes, marshmallow fluff can be used as a substitute for marshmallows. The texture might be slightly different but just as delicious.
25. How can I add a chocolate flavor without using chocolate chips?
Cocoa powder can be added to the marshmallow mixture, or you can use chocolate-flavored cereal.
26. What’s the best way to serve Fruity Pebbles Treats at a party?
Cut them into small squares or use cookie cutters for fun shapes, and serve them on a colorful platter.
27. Can I double the recipe?
Yes, simply double the ingredients and use a larger pan or two pans.
28. Why is it important to remove the marshmallow mixture from heat before adding the cereal?
This prevents the cereal from getting too soggy and helps maintain the crisp texture.
29. Can I use colored marshmallows?
Yes, colored marshmallows can add an extra pop of color and fun to your treats.
30. What if I don’t have a 9×13 inch pan?
You can use any size pan, but the thickness of your treats will vary. Adjust the pressing and cutting accordingly.

